
Altenew All about layering II

 I finally got a few photos done and have so many more to do... but I'm not disappointed in how many.  I have most of the class projects completed, yet struggle with time to get them uploaded and detailed info to go with them.  Life stuff.

So to the project shall we?  In the All about layering II course, Nicole has a lot of tips on getting your layers to line up.  She did such an amazing job explaining the steps and cheering you on to keep practicing.  I have enjoyed her as an instructor!  I definitely want to keep up the practicing!  The layered images are too beautiful not to.  

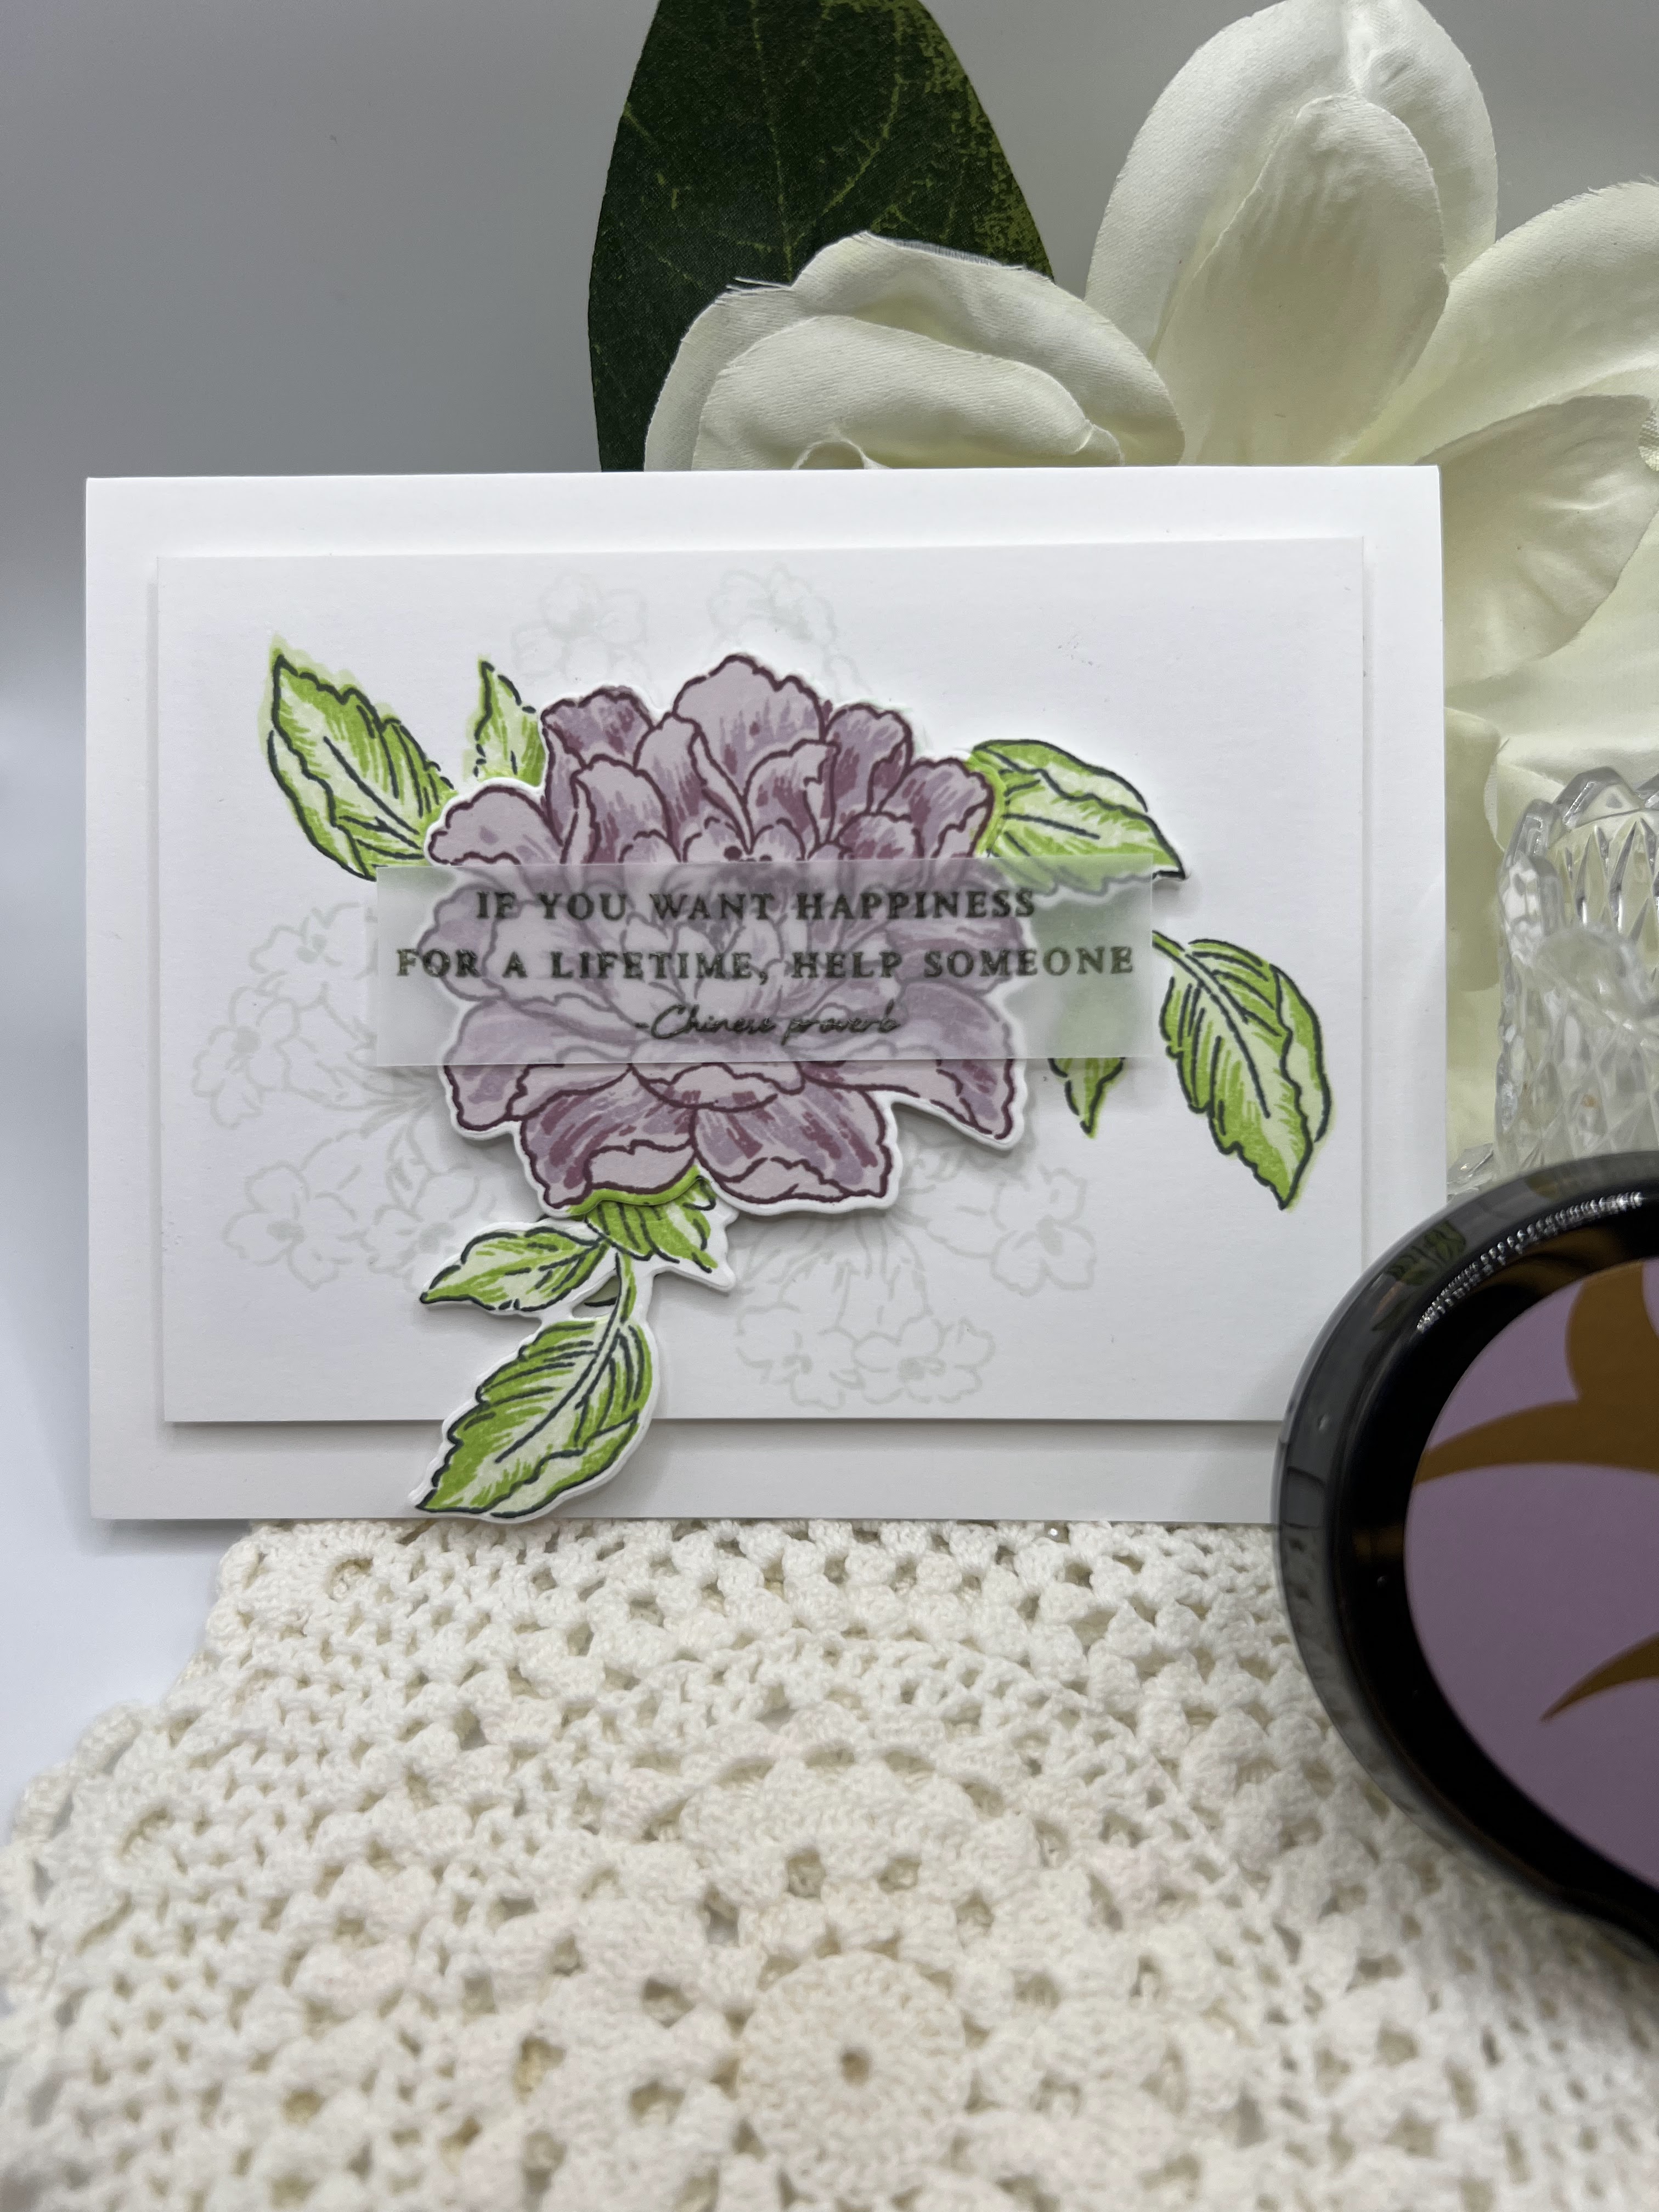
I'm gonna get long-winded her but I tend to be over the top in explaining how I did things.  For this card, I used Nina Solar White 80 pound cardstock for my card base and panel.  I used quite a few ink colors.  For the flower, I used Pale Mauve, Amethyst, Grape Agate, and Plum crisp die inks.  For the leaves, I used Pistachio, Limeade, Green Onyx crisp die inks and the Sprays on the card base, I used contour ink by Hero Arts.  I tried my hand at masking so that I could lay the leaves and spray of flowers down as close the flower as possible without stamping on that gorgeous flower.  Btw, the stamp and die set I used was the Build-A-Flower: Coral Charm stamp and die set.  When I was done, I wasn't happy with the flatness of it.  So, I did another flower and leaves set and trimmed the card base down to 3 1/2 by 4 3/4.  After I had stamped and cut the images out, I Added foam tape to each of the elements and layered them over the original flower.  Added the extra die-cut leaves as well with foam tape to give them more dimension.   For the sentiment, I chose to stamp it on vellum with Altenew obsidian ink.  Then used clear embossing powder on the stamped sentiment to give it more pop.  I trimmed down the main element to balance the size with the card base.  I used some liquid glue to adhere the vellum to the flower, making sure the area I added glue to, would not show through the vellum.  I then added a piece of craft foam to the back of the card base and mounted on to the A5 card base.  I am so glad I didn't trim the leaves hanging from the bottom because it didn't end up being longer than the card base, which I love!  Thank you for sticking it out and reading my explanation  on how to make the card.  


Comments

Erum Tasneem said…
Beautiful work, Jami. Looks so elegant!

Popular posts from this blog

For The Guys Course

 I have a few guys that I buy cards for, but making them a card is so much easier now that I have finished this course with Jen.  It's called For The Guys .  She gives so many tips on how to make it more guy themed.  The one thing that bummed me out was that there were a few stamp sets I fell in love with, that Altenew doesn't carry any more.  Over all though, I loved the course! For my card, I used blue tones but kept the image as a flower.  I enjoyed making this one because  I love using embossing powder to build up images.  The flowers on the card were created using the Folk Flowers stamp and die set along with the coordinating stencil for the background.  It's a 5x7 card with some decent layers for added dimension.  I chose not to use the stamp on the flower image so that it would be less of a flower and more attention to the leaves. The die cut flowers were inked up with Iceberg Crisp Ink and each time I added a layer of ink, I us...

Blogging is not my super power... all about layering 1

I'm not sure I have one, but I haven't blogged in about 10 years or more.  I used to post on a regular basis back when I was knee deep in 3 kids, 4 dogs, 3 hamsters, a gecko, carpooling, crafting, design teams and magazine publications. Fast forward to today...  I am officially a grandma to 2 beautiful little girls.  My children are all grown and having their own babies.  Life is good.   My husband and I are retired now and have slowed the pace a bit.   I still love paper crafting and photography.  I don't think that will ever change. I am taking courses with Altenew Academy and this is my first post for the All About Layering 1 course.  I had never been much into stamps because it seemed so difficult to get the images to come to life.  I did a ton of one color stamping and a ton of embossing.  That was years ago before the layered stamps came out and the Misti was invented.  I am in love with making cards with stamps now!...

Level 1 Challenge ~ Altenew Academy

At the end of the  Level 1 courses  with  Altenew Academy , you are given a challenge to see if you are ready for the next level of courses.  I was assigned to use 3 techniques from the 10 courses and to create gift sets with both masculine and feminine themes or colors. When creating the packaging for these sets, you are also required to use a recycled element in some way.   I created 5 cards for each set.  The cards were created using the techniques from quite a few of the courses, so the main three that I focused on are, Celebration Stencil Techniques, Clean & Simple Boutique Cards, and Let It Shine.  Celebration Stencil Techniques  gave me the idea that I could Stamp an image, emboss it and then use the stencils to add color while still having image be visible being the main focal point.   Clean and Simple Boutique Cards  helped me to realize that it doesn't have to have a ton of elements to be a card you are p...